Message templates
Insert reusable message snippets in the composer, and manage the practice's template library.
Templates save you retyping the same answers — opening hours, directions, deposit reminders. This page shows you how to insert one while replying and how to manage the practice's template library.
Insert a template while replying
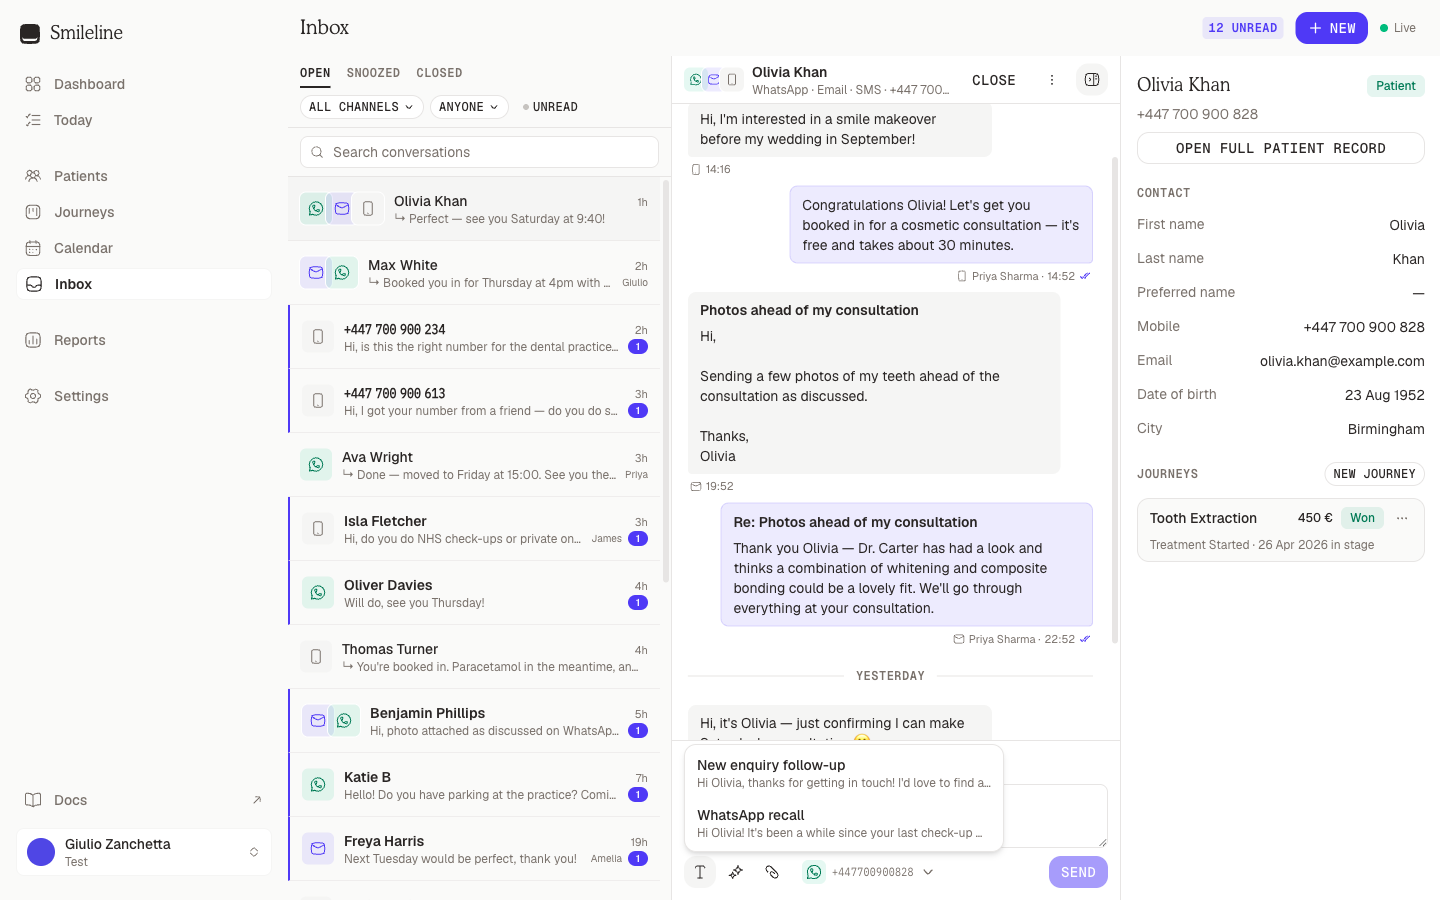
Open the conversation and click the template icon (the leftmost button under the composer, titled Insert template).
Pick a template from the popover. It only lists templates that fit the reply's channel, plus channel-agnostic ones.
The template body is inserted into the composer with its merge tags already filled in — the patient's name, your practice details and so on. What you see is exactly what will send.
Edit the text if you like, then send. On an email reply that is Cmd/Ctrl + Enter or the Send button; on every other channel Enter sends.
For email replies, a template with a subject also fills the subject field if it's still empty.
Merge tags
Template bodies can contain merge tags that resolve when the template is inserted:
| Tag | Resolves to |
|---|---|
{{patient.firstName}} | The patient's first name (their preferred name when set) |
{{patient.lastName}} | The patient's last name |
{{practice.name}} | Your practice name |
{{practice.website}} | Your practice website |
{{practice.signature}} | The email signature from Settings → Practice |
{{practice.logo}} | The email logo from Settings → Practice, as a picture |
{{location.name}} | The location's name |
{{location.phone}} | The location's phone number — a tap-to-call link in emails |
{{location.email}} | The location's email address |
{{location.address}} | The location's full address |
{{location.openingHours}} | The location's opening hours, formatted |
{{appointment.date}} | Booking date — the day of the booking, such as Friday 17 July |
{{appointment.time}} | Booking time — the time of the booking, such as 14:30 |
{{followUp.date}} | Follow-up date — the day of the call back agreed on Today, such as Friday 17 July |
{{followUp.time}} | Follow-up time — the time of that call back, such as 14:30 |
{{followUp.assignee}} | Follow-up assigned to — the first name of the team member making it, such as Devon |
{{owner.firstName}} | Lead owner first name — the first name of the lead's owner, such as Feria |
Location tags resolve against the site set as the automation location in Settings → Practice, falling back to your first location.
Booking date and Booking time fill in only when an automation sends the message. In booking messages they are the date and time of the booking the message is about. In follow-ups they are the lead's next booked consultation, and blank when nothing is booked. Inserted by hand into a reply they are blank, and campaigns don't offer them. Both are written the way your practice's country writes dates: Friday 17 July and 14:30 in the UK, Friday, July 17 and 2:30 PM in the US, and in Italian in Italy (venerdì 17 luglio).
The three Follow-up fields fill in only in follow-ups, and Lead owner first name only in follow-ups; anywhere else they are blank.
In an email, {{location.phone}} becomes a link that starts a call when tapped. A text or WhatsApp message can't carry a link, but the patient's phone makes the number tappable on its own.
A tag that can't be resolved — for example a patient tag in an unlinked conversation — is inserted as blank text, never as raw braces.
WhatsApp templates and Meta approval
WhatsApp only allows free-text messages within 24 hours of the patient's last message. Outside that window — and when starting a new WhatsApp conversation — you must send a template that Meta has approved for your account.
Smileline handles the approval for you. Every WhatsApp-channel template is submitted to Meta automatically:
- The standard reminder set (booking confirmation, appointment moved, 48-hour and 24-hour reminders, after your visit, missed appointment, cancellation) comes with every practice as WhatsApp templates. They are submitted the moment your WhatsApp connection is active.
- Reopen chat (WhatsApp) comes with every practice too, in your practice's language. It apologises for missing the patient's message and asks them to reply: "Hi, sorry we couldn't get back to you in time about your message to
{{practice.name}}. Reply here and we'll carry on the conversation." It names only your practice, never the patient, so it sends in any chat. Once approved it is the first button the composer offers after the 24-hour window closes. - A WhatsApp template you write yourself is submitted within a few minutes of saving it.
- Templates you already created in WhatsApp Manager are imported into the list, with their Meta status.
Each WhatsApp template shows its status in Settings → Templates:
| Status | Meaning |
|---|---|
| Not submitted | Waiting for a WhatsApp connection. Connect WhatsApp under Settings → Channels and it goes out by itself. |
| Submitting shortly | Saved; Smileline sends it to Meta within a few minutes. |
| In review at WhatsApp | Meta is reviewing it. Most decisions arrive within an hour; Meta allows itself up to 24 hours. |
| Approved by WhatsApp | Ready. The composer offers it as a one-click send when the 24-hour window is closed; hover over the button to read the message the patient will get. |
| Rejected by WhatsApp | Open the template: Meta's reason is shown. Fix the text, save, and it is submitted again as a new version. |
| Paused / Disabled by WhatsApp | Meta stopped it after negative feedback. It is withdrawn from the composer until Meta reinstates it. |
| Needs attention | Something outside the text: the connection lacks the template permission, the account's template quota is full, or several submissions failed in a row. The template says which. |
The merge tags in your text become Meta's placeholders in the order they appear, so what you see in Smileline is what Meta approves and what sends. Each merge tag can appear only once in a WhatsApp template, because Meta rejects a template that reuses a placeholder; the editor tells you if you repeat one.
Choose a Category when you write the template: Utility for appointment confirmations, reminders and account updates, Marketing for offers and promotions. Meta reviews the category too and may re-file it — the template then shows the category Meta chose. Marketing templates cost more per message, are subject to WhatsApp's marketing opt-out, and are not delivered to US numbers. Language defaults to your practice's country; pick another when the text is written in a different language.
Editing an approved template
Saving a change to an approved template sends the new text to Meta as a new version. The approved text keeps sending until the new version is approved, at which point the template switches over — nothing is interrupted, and reminders already scheduled with the old text keep working. Smileline asks you to confirm before it submits. A change that only swaps one merge tag for another — {{patient.firstName}} for {{patient.preferredName}}, say — does not go back to Meta at all, because Meta's copy is unchanged.
Imported templates
A template created in WhatsApp Manager arrives with Meta's numbered placeholders ({{1}}, {{2}}, …). Replace each one with a merge tag and save; the template is then ready to send without going back to Meta. A template that uses features Smileline cannot fill yet — named parameters, a picture or document header, buttons with variables, or an authentication template — is shown read-only with the reason.
Numbers in several WhatsApp accounts
When your WhatsApp numbers belong to more than one WhatsApp Business Account, each account reviews its own copy of every template. You still write one text, with one set of merge tags; Smileline submits it to every account.
- An edit goes live only once every account has approved it. Until then, every number keeps sending the approved text.
- Each number sends the copy its own account approved, so a template paused in one account keeps sending from numbers in the others.
- A number whose account hasn't approved a template yet can't send it. The composer says "This template isn't approved for this WhatsApp number yet.", an automation skips that message instead of sending it, and a campaign through that number can't be launched until the account approves.
- A text one of your automations still uses is submitted to a newly connected account too, so the automation keeps sending from every number.
The template dialog shows each account's review separately. In Settings → Templates a template shows Approved by WhatsApp only once every account has approved it; if any account rejected, paused or disabled it, that is what you see. Resubmit for review resubmits it wherever it was turned down, or where the approved version waiting to go live uses a feature Smileline cannot fill.
Manage the template library
Templates live in Settings → Templates. Owners and managers can create and edit them; everyone else can use them in the composer.
Go to Settings → Templates and click New template.
Give it a Name and choose a Channel — Any channel makes it available everywhere, or pick WhatsApp, SMS or Email to scope it.
Write the message. Email templates get the visual editor and a Subject; SMS, WhatsApp and Any channel templates get a plain text box. WhatsApp templates also take a Category and a Language, and are submitted to Meta for approval when you save.
Add merge tags where you want them. In an email, type { and pick a field from the list that appears. On any channel, the merge-tag buttons under the editor insert one at the cursor.
Click Save. The template appears in every composer straight away.
It is the same editor everywhere a template is edited, including the Edit template button inside an automation step — so an email keeps its design no matter where you change it.
To retire a template, click Archive on its row — it disappears from the composer but stays in the list, and Restore brings it back.
The email visual editor
Email templates are written in a visual editor rather than a plain text box.
- Plain paragraphs read like a personal email — that is the default, and usually the right one for a follow-up.
- Type
/for layout blocks: headings, lists, quotes, buttons, dividers, sections and columns. - Type
{to search the merge tags and insert one. Keep typing to filter the list, then pressEnter, or click the one you want. - Select text to get formatting options.
- Click Image to add a picture, or paste and drag one straight into the body.
- Press
Escapeonce to close an open menu, and again to close the dialog.
Images
Click Image below the editor to upload a picture or reuse one you have already uploaded. Anything you upload joins your practice's image library and stays available in every template, campaign and reply, so a logo only needs uploading once.
Use JPEG, PNG or GIF, up to 2 MB each. Images are hosted for you and load from a link in the email, so keep them small enough to appear quickly on a phone. The library lists the newest images first; Load more at the bottom brings up older ones.
Deleting an image from the library breaks it in emails you have already sent, because those emails load it from that same link. Leave it in place unless you want it gone everywhere.
WebP images are rejected. Outlook cannot display them, and a picture that silently fails to load in a patient's inbox is worse than one you could not upload.
Many people read email with images switched off, so never put words that matter, such as an appointment time or a cancellation link, inside a picture.
The editor writes the email at 600px wide, which is the standard for email clients. On a narrow screen it shrinks to fit — what recipients see on a phone.
Writing the HTML yourself
Some emails are easier to paste than to rebuild — a design an agency sent you, a layout with its own styling, a newsletter you already use elsewhere. Above the body, switch from Visual to HTML and write the markup directly.
Click HTML above the editor. If you have not written any HTML yet, Smileline starts you off with the current design's markup, so you can adjust it rather than begin from nothing.
Type or paste your HTML in the Code tab. It is a real code editor — highlighting, closing tags and indentation all behave as you would expect.
Merge tags work exactly as they do in the visual editor. Type them yourself, or
click a tag button below the editor to drop one in at the cursor. Image adds
a picture from your library as an img tag.
Open the Preview tab to see the result. Merge tags appear as themselves here — they only resolve when a message actually sends.
Click Save. The template sends your HTML exactly as written.
Your HTML is sent untouched, style blocks and all, so responsive layouts keep
working. Smileline builds the plain-text version of the email from your markup
automatically, for the small number of people whose mail app cannot show HTML —
which is why a design made only of images is refused unless it has a subject to
fall back on.
The two modes hold separate drafts, and Save commits whichever one you have open. Saving in HTML replaces the visual design; saving in Visual replaces your HTML. Switching back and forth before saving changes nothing, so it is safe to look.
An HTML template cannot be re-opened in the visual editor with its markup intact — the visual editor only understands its own blocks. Keep a template in one mode or the other.